Integrating Apache AGE Docker Image and PGAdmin 4: A Step-by-Step Guide
Integrating Apache AGE Docker Image and PGAdmin 4: A Step-by-Step Guide
Introduction
Welcome to our step-by-step guide on integrating Apache AGE Docker Image with PGAdmin 4! Whether you're a seasoned database administrator or a curious beginner, this tutorial will walk you through the process with ease. Get ready to unlock the power of graph databases and streamline your database management with PGAdmin 4. Let's dive in!
Prerequisites
Before we begin, ensure you have the following setup:
- Operating System: Arch Linux running on WSL2, on top of Windows 11.
- Docker: Installed and running.
- PGAdmin4: Installed and ready to launch (I have it installed on Windows).
Starting Apache AGE Docker Container
First, let's get the Apache AGE Docker image up and running. Follow these steps:
- Pull the Apache AGE Docker image:
Visit the Docker Hub page for Apache AGE here and follow the instructions. Use the following command to pull the image:
docker pull apache/age
- Run the Docker container:
Execute the following command to start the container with the necessary environment variables:
docker run \
--name age \
-p 5455:5432 \
-e POSTGRES_USER=postgresUser \
-e POSTGRES_PASSWORD=postgresPW \
-e POSTGRES_DB=postgresDB \
-d \
apache/age
These settings are crucial for the PGAdmin4 setup, so take note!
- Starting an existing container:
If you’ve run this container before, start it again with:
docker start <age_container_name>
If you're unsure about the container name, list all previously run containers with:
docker ps -a
Look for the container name under the "NAMES" column associated with the "apache/age" image—it's probably named "age."
Setting Up PGAdmin4
Now, let's configure PGAdmin4 to connect to our Apache AGE Docker container:
- Install PGAdmin4:
Download and install PGAdmin4 from the official website.
- Launch PGAdmin4:
Open PGAdmin4 and navigate to Object > Register > Server.

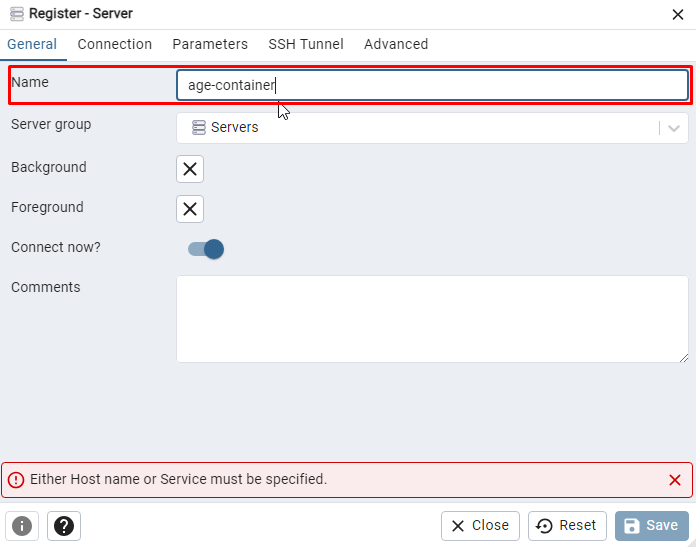
- Name your server:
Enter a name for your server. This can be anything you like.
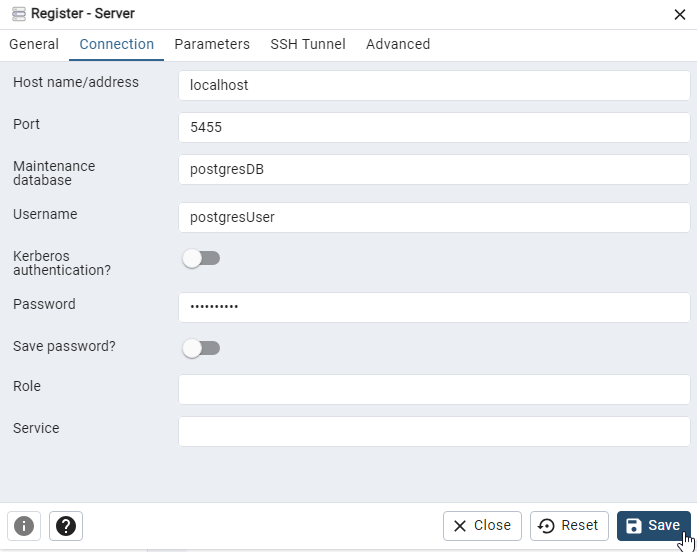
- Configure the connection:
In the "Connection" tab, fill in the fields as follows:
- Host name/address: localhost
- Port: 5455
- Maintenance database: postgresDB
- Username: postgresUser
- Password: postgresPW
- Save and connect:
Click "Save" to establish the connection.
Checking Schemas and Tables
With the connection established, let's explore the schemas and tables:
- Apache AGE organizes graphs into schemas.
- The ag_catalog schema is pre-made and includes many useful functions to support your graph database needs.
Navigate to the "Schemas" section in PGAdmin4 to explore these resources.

Conclusion
Congratulations! You have successfully integrated Apache AGE Docker image with PGAdmin 4. You can now take full advantage of graph databases and manage them seamlessly with PGAdmin 4. We hope you found this guide helpful.